
Setting up a modern JavaScript game development environment in 2020 is relatively pain free. And the rewards hugely outweigh the struggles. Stick around, and you’ll have a fresh new JS game development environment (complete with superpowers) running locally in no time!
Phaser is a JavaScript game development framework that gives you all sorts of essential functionality that 2D games use, such as: spritesheets, tilemaps, various physics engines, particle systems and more.
We’ll be delving into such topics in later tutorials, but today, we’re setting up a modern ES6 JavaScript compatible environment to write our Phaser games in. This article is split into the following sections:
- [0] Why You Want To
- [1] Dependencies
- [2] JavaScript
- [3] CSS
- [4] HTML
- [5] Static Assets
- [6] So What Now Phaser?
I recommend you read them in order (especially if you’re new to things like NPM, Webpack, and Babel), but everyone’s free to make their own decisions in life and ultimately the universe is one big constant whirlwind of chaos and anarchy.
¯\(ツ)/¯
[0] Why You Want To
” Thanks, but I prefer my code like wet spaghetti. “
- Nobody Ever
So really, setting Phaser 3 up is as simple as adding a CDN link to your index.html… So why complicate it?
A few reasons. Namingly:
- Access to the NPM ecosystem.
- ES6 Transpiling.
- LESS/SASS if you’re into that.
Access to the NPM ecosystem.
Having your project setup in NPM (explained further below) gives you access to a wealth of tools, libraries, and frameworks. In the case of this tutorial, we’ll be using NPM to install Phaser, Webpack, Babel, and some other helper developer dependencies.
But what if you wanted something to make working with dates easier?
npm install moment.js
Okay, but my game also has a DOM & needs jQuery*…
npm install jquery
* No project needs jQuery in 2020, sorry. (╯°□°)╯︵ ┻━┻
Okay okay, but that jQuery-Phaser project also needs React cause it’s a web app*…
npm install react react-dom
* Don’t really install 3 big dependencies unless for some weird reason, you really need them. This would result in a pretty massive JavaScript file. ┬─┬ ノ( ゜-゜ノ)
ES6 Transpiling.
Next on the dreamboat JavaScript developer super-power-wish-list is the ability to write ES6 JS (aka that sexy new syntax everyone’s talking about). It works through the magic of the Babel transpiler. In goes fancy, new, ES6 JS… And out comes browser-compatible ES5. You write the new JS, the browsers see the old.
You write code like this (with awesome new features of ES6):
import {GameObjects} from 'phaser';

const {Sprite, Container} = GameObjects;

class CoolCharacter extends Container {

// And so on...
And once we have Babel setup, it’ll transpile our fancy code above, into the older, widely compatible JS. If you want to see this transpilation process in action, check out the live demo on Babel’s homepage.
LESS/SASS if you’re into that.
We’re not going to touch on it much in this tutorial, as we’re focused on game development here, but it’s possible to setup LESS or SASS compiling for your CSS if that’s something you like.
Using a “CSS Preprocessor” as they’re called, is similar to what we setup in the previous section for our JavaScript, only in this case it’s for CSS. It gives you access to features not yet available in your stock, vanilla CSS experience. Some such features:
- Variables.
- Selector nesting.
- Partials & importing.
- Mixins & functions.
- More…
Like I said, we’re not gonna be setting this up for our environment, since our game will only use a few lines of CSS (if any at all, depending on your case).
[1] Dependencies
The first destination in our journey is to install the tools we’ll be using later in our game development environment. For this, we’ll be using Node Package Manager, also known as NPM.
If you haven’t already installed NPM (+ NodeJS), you can head on over to the NodeJS website, and run their installer for your operating system (this should be fairly straightforward).
After that’s all setup, open up your CLI (Command Line Interface) of choice. For this I’m just using the stock Ubuntu terminal, but anything you like works here! Step one for our new project is to create a directory for it:
mkdir KirkzCoolGame2020
Next, change directory into it:
cd KirkzCoolGame2020
Now, with NPM installed you can run the following:
npm init
You’ll be walked through a simple project initialization process, which is just a series of questions about your project (spam Enter if you want to leave it all default).
Great success! Now you’re able to tap into the wondrously expansive collection of source code that is NPM. Why re-invent the wheel* when we have a storehouse of millions of free wheels (not to mention steering racks, windows, doors, ignitions, and tons more poor car analogies)?
* I'd like it on the record, that I do strongly believe there is a time and place to reinvent the wheel.
Alright, so next up now that our project is freshly NPM’ilized is to start installing our developer dependencies. If that term is unfamiliar, it simply means that these are tools and libraries and things we’ll install that are only included in our development build. Things that your final production build won’t need, but help us develop that final build.
In our case this includes:
- Webpack.
- Webpack CLI.
- Webpack dev server.
- Babel core, loader, & preset environment.
- CSS loader & mini CSS extract plugin.
- HTML loader & HTML Webpack plugin.
- Copy Webpack plugin.
After the developer dependencies are installed, we’ll install our (singular) production dependency (this is, in our case, the single library that will be included in our production build):
- Phaser.
However, if you’d rather hurry things along and move on to the configuration, you can skip ahead to the [2] JavaScript section, just be sure to run the following two commands in your project root to install all the dependencies:
npm install webpack webpack-cli webpack-dev-server @babel/core babel-loader @babel/preset-env css-loader mini-css-extract-plugin html-loader html-webpack-plugin copy-webpack-plugin --save-dev
And, for our production dependencies:
npm install phaser
But again, only run the above two commands if you want to skip the followings individual sections which explain what each dependency is, and a little about what each does.
Webpack.
Our first dependency is the wunderbar asset bundler (and more*): Webpack. It’s a module bundler, that enables you to split your code into multiple files and modules. You can also use Webpack to automate repetitive tasks. All of which, we’ll be taking advantage of later. npm install webpack –save-dev
* You can do a lot with Webpack. For more information check out their site.
Webpack CLI.
Next addition to our dependency tree are the CLI tools for Webpack. This will give our project the tools necessary to interact with Webpack from the command line.
npm install webpack-cli --save-dev
And actually, since we’re using Webpack version 4, we could actually spin up a completely config-less JavaScript project with a little file modification, addition, and one new directory.
But we’ve got a few more dependencies to get us to a stage where we’re making games…
Webpack dev server.
The next thing we need is a development server to locally run and test our game. For this we’ll be using the handy Webpack Dev Server:
npm install webpack-dev-server --save-dev
That installed, we can run our Webpack config in a https//localhost:WXYZ/ environment. Pretty cool!
Babel core, loader, & preset environment.
Now we need to install Babel. We’re using Babel in this project to transpile our JavaScript code from ES6 down to ES5. I described this a little bit earlier, but in summary, you get to write using awesome new syntax features such as proper OOP, destructuring, fat arrow functions, and more.
To install our Babel setup, let’s run:
npm install @babel/core babel-loader @babel/preset-env --save-dev
With those three dependencies, we’ve got everything we need for Babel to work, as well as integrate with Webpack nicely.
CSS loader & mini CSS extract plugin.
CSS isn’t something we’re going to be using extensively in our game development environment, because everything in our game (typically) will be rendered on canvas.
Still, it’s nice to have a bit of automation in our styling workflow. To install our CSS-related dependencies, run:
npm install css-loader mini-css-extract-plugin --save-dev
Now we’ve got some configurable options for writing stylesheets in our Webpack workflow. Onward!
HTML loader & HTML Webpack plugin.
Since our game is web-based, we need our workflow to be able to account for the web page it’s going to live on. Run the following to install our HTML build tools:
npm install html-loader html-webpack-plugin --save-dev
Copy Webpack plugin.
For our last dev dependency, we’re going to be installing the Copy Webpack Plugin. This plugin will enable us to copy static assets (such as images, JSON files, sound, and more) from our src directory to our production-ready dist directory.
To install, run:
npm install copy-webpack-plugin --save-dev
Great! Now we’ve got all dependencies necessary for our development environment good to go. The next and final dependency we need, is also our first and only production dependency. That is to say, it’s the only one that will actually be included in our final project bundle…
Phaser
Phaser is the wonderful, feature-rich game framework we’re using. In this tutorial I’m assuming you already know what it is, but if in doubt, be sure to check out their website.
Woohoo! We now have everything we need installed!!
Execute the following command to view your package.json file:
less package.json
Then, I would recommend scanning through your "devDependencies" & "dependencies" keys to ensure they look something like this:
{
  // ... The homepage, bugs, etc. of your package.json file.

  "devDependencies": {
    "@babel/core": "^7.2.2",
    "@babel/preset-env": "^7.2.3",
    "babel-loader": "^8.0.5",
    "copy-webpack-plugin": "^4.6.0",
    "css-loader": "^2.1.0",
    "html-loader": "^0.5.5",
    "html-webpack-plugin": "^3.2.0",
    "mini-css-extract-plugin": "^0.5.0",
    "webpack": "^4.28.4",
    "webpack-cli": "^3.2.1",
    "webpack-dev-server": "^3.1.14"
  },
  "dependencies": {
    "phaser": "^3.15.1"
  }
}
Your version numbers will probably look a little different, unless you’re coding this inside a Tardis or some other time machine.
[2] JavaScript
First step in our JavaScript development is to create our src directory, which will hold all the code & assets for our project. After that, we’ll create an game.js file which we’ll later define as our entrypoint. We do this with a couple commands…
From your project root, run:
mkdir src
That will make the src directory, then finally run:
touch ./src/game.js
This will create an empty game.js file within the src directory.
With all our dependencies freshly installed, we now have to work on a few configuration files. The first of which, is a modification to our "scripts" key within our package.json file. Replace the default "test" command with the following:
{
  // ... The name, version, etc. of your package.json file.

  "scripts": {
    "start": "webpack serve --mode development --entry ./src/game.js",
    "build": "webpack --mode production --entry ./src/game.js --output ./dist/game.js",
    "dev": "webpack --mode development --entry ./src/game.js --output ./dist/game.js"
  },

  // The repository, author, etc. of your package.json file...
}
This gives us a few new functions we can run within our project:
npm run start
Will startup our handy dandy dev server. After running this command navigate to localhost:8080.
npm run build
Will package up all our future JS files and everything else, then place the resulting minified, optimized game in the dist directory.
npm run dev
Will do the same as npm run build, only the resulting output will be optimized for development, rather than production environments.
* Note we've likely got a bit more configuration setup to do before our development server will work. So if this isn't working properly at this point don't sweat it.
Next up, we need to create a webpack.config.js file, which is used to tell Webpack the specifics on how to handle our project.
Run the following from our project root to create an empty config file:
touch webpack.config.js
Then, use your favourite text editor to open it up, and we’ll get to work. In our empty file, start by adding the following:
module.exports = {
  module: {
    rules: [
      {
        test: /\.js$/,
        exclude: /node_modules/,
        use: {
          loader: "babel-loader"
        }
      }
    ]
  }
};
So far, our configuration file is telling Webpack that we want to run any file ending in .js through Babel. We’re going to add more to this file later, but for now this will do.
We have to create one more configuration file to get Babel transpiling working. That file is called .babelrc and is intended to contain any config specific to Babel.
Just like before, in our project root run:
touch .babelrc
Then open it in your editor, and add the following:
{
  "presets": [
    "@babel/preset-env"
  ]
}
And that’s it! You should now have a project with working ES6 to ES5 JavaScript transpilation.
To test this you can add some ES6 JS inside your src/game.js file, running npm run dev or npm run build, then looking at the resulting transpiled JS inside dist/game.js (you can run less dist/game.js from the project root to do this).
[3] CSS
Since our dependencies are all installed by this point, setting up our CSS configuration is fairly straightforward.
The first step is to make a couple additions to our webpack.config.js file:
const MiniCssExtractPlugin = require("mini-css-extract-plugin");

module.exports = {
  module: {
    rules: [
      {
        test: /\.js$/,
        exclude: /node_modules/,
        use: {
          loader: "babel-loader"
        }
      },
      {
        test: /\.css$/,
        use: [MiniCssExtractPlugin.loader, "css-loader"]
      }
    ]
  },
  plugins: [
    new MiniCssExtractPlugin({
      filename: "[name].css",
      chunkFilename: "[id].css"
    })
  ]
};
This imports our CSS plugin and tells Webpack to be aware of any files ending in .css and to handle them using the MiniCssExtractPlugin, and at the very end of the file, we create an instance of MiniCssExtractPlugin and pass in some configuration about what our files will look like.
With that done, we need to create a CSS file and import it inside our src/game.js file to get it brought over to our dist directory.
To do this, run:
touch src/main.css
You can add whatever CSS you like to your new stylesheet. As long as there’s something in there to test with you’ll be golden.
Lastly, we need to import our main.css file inside our JavaScript file (if this sounds weird, don’t fret, it’s how we make Webpack aware of it in our setup).
So open src/game.js and add this line to the very top of the file:
import style from "./main.css";

// Any other JS you had here from earlier testing...
Great! Now Webpack will know about our CSS file because we’ve linked to it in our entrypoint file (src/game.js).
Let’s move on to integrating our HTML…
[4] HTML
For our game to appear in a browser, we’re gonna need a dist/index.html file to appear in our production/development builds. If you want to, you can load in any external assets from CDNs from this file, though I would recommend installing future dependencies via NPM to take full advantage of the architecture you’ve almost setup via this tutorial.
So first things first, let’s create our HTML file:
touch src/index.html
Inside that file, add some basic boilerplate HTML for our game:
<!doctype html>
<html lang="en">
  <head>
    <meta charset="utf-8">
    <meta name="viewport" content="width=device-width, initial-scale=1, user-scalable=no">
    <title>KirkzCoolGame2020</title>
  </head>
  <body>
    <canvas id="game-canvas">You need JS bruh.</canvas>
  </body>
</html>
Note that we’re not specifying a JS file. This will be automatically appended to our <body> for us by Webpack once we’re fully setup! One reason for this is in more advanced Webpack setups (for which I’ll likely write a tutorial in the future), you can leverage something known code splitting, which can drastically improve load times, and when doing so you’ll end up with filenames that contain an automatically changing hash.
Anyways, with out src/index.html in place, we can now make a couple more modifications to our webpack.config.js file:
const HtmlWebpackPlugin = require("html-webpack-plugin");
const MiniCssExtractPlugin = require("mini-css-extract-plugin");

module.exports = {
  module: {
    rules: [
      {
        test: /\.js$/,
        exclude: /node_modules/,
        use: {
          loader: "babel-loader"
        }
      },
      {
        test: /\.html$/,
        use: [
          {
            loader: "html-loader",
            options: { minimize: true }
          }
        ]
      },
      {
        test: /\.css$/,
        use: [MiniCssExtractPlugin.loader, "css-loader"]
      }
    ]
  },
  plugins: [
    new HtmlWebpackPlugin({
      template: "./src/index.html",
      filename: "./index.html"
    }),
    new MiniCssExtractPlugin({
      filename: "[name].css",
      chunkFilename: "[id].css"
    })
  ]
};
And that should be it for HTML! Let’s try testing our dev server now that there’s an index.html file in our dist directory.
Run the following to boot up our dev server:
npm run start
After a couple seconds or so, a new tab should open in your browser directing you to localhost:8080 or some other port number. That tab should be a plain blank page, but if you view the source, you should see something like this:
<html lang="en"><head> <meta charset="utf-8"> <meta name="viewport" content="width=device-width,initial-scale=1,user-scalable=no"> <title>KirkzCoolGame2020</title> <link href="null.css" rel="stylesheet"></head> <body> <canvas id="game-canvas" width="661" height="669" style="image-rendering: pixelated; width: 661px; height: 669px;">You need JS bruh.</canvas> <script type="text/javascript" src="null.js"></script> </body></html>
Note the JavaScript file being appended to the <body>, and the stylesheet being appended to the <head>. Also note that in our real production and dev builds (achieved by running npm run build or npm run dev) the files won’t be named null.js or null.css, but will instead follow whatever naming convention you specified in package.json.
[5] Static Assets
Eventually you’re likely to need more than just JavaScript, CSS, and HTML for your game. Eventually you’ll be wanting JSON map files, spritesheet images, UI graphics, music, sound effects, and anything else under the sun.
One way to do this would be to simply leave all your static assets in the dist directory. However this isn’t advisable as dist (or any build folder) usually isn’t committed to source control, such as Git. We want our assets to instead live in the src directory, and be copied to the dist directory. To achieve this this, we’re going to configure CopyWebpackPlugin.
The first and only step (since we’ve already installed our dependencies) is to open up your webpack.config.js and add the following:
const HtmlWebpackPlugin = require("html-webpack-plugin");
const MiniCssExtractPlugin = require("mini-css-extract-plugin");
const CopyWebpackPlugin = require("copy-webpack-plugin");

module.exports = {
  module: {
    rules: [
      {
        test: /\.js$/,
        exclude: /node_modules/,
        use: {
          loader: "babel-loader"
        }
      },
      {
        test: /\.html$/,
        use: [
          {
            loader: "html-loader",
            options: { minimize: true }
          }
        ]
      },
      {
        test: /\.css$/,
        use: [MiniCssExtractPlugin.loader, "css-loader"]
      }
    ]
  },
  plugins: [
    new HtmlWebpackPlugin({
      template: "./src/index.html",
      filename: "./index.html"
    }),
    new MiniCssExtractPlugin({
      filename: "[name].css",
      chunkFilename: "[id].css"
    }),
    new CopyWebpackPlugin({
      patterns: [
        { from: './src/assets', to : 'assets' }
      ]
    })
  ]
};
And just like that, anything we add to the src/assets directory will be copied to dist/assets and can be accessed by our production and development builds.
[6] So What Now Phaser?
Well, now that we’ve installed and set everything up, why don’t we make a quick demo with Phaser to see why our new setup is so awesome.
First, let’s edit our src/game.js and add the following:
import './main.css';
import Phaser, {Game} from 'phaser';
import BootScene from './scenes/BootScene';
import GameScene from './scenes/GameScene';

const canvas = document.getElementById('game-canvas');
const config = {
  type: Phaser.WEB_GL,
  width: 400,
  height: 300,
  canvas,
  physics: {
    default: 'arcade',
    arcade: {
      gravity: { y: 400 },
      debug: true
    }
  },
  scene: [
    BootScene,
    GameScene
  ]
};

const game = new Game(config);
If we boot up our dev server just now we’ll be faced with an error. We can fix that by adding a couple new files to src.
First, create a new directory called scenes:
mkdir src/scenes
The a couple touch commands so those files… Exist at least:
touch src/scenes/BootScene.js
touch src/scenes/GameScene.js
Great success! With those files ready to go, let’s first open src/scenes/BootScene.js in our editor and add the following syntactically beautiful JavaScript:
import {Scene} from 'phaser';

class BootScene extends Scene {
  constructor() {
    super("scene-boot");
  }

  preload() {
    // Load any assets here from your assets directory
    this.load.image('cat-like', 'assets/cat-like-creature.png');
  }

  create() {
    this.scene.start('scene-game');
  }
}

export default BootScene;
Then, as you may have seen coming, we need to create our src/assets directory, and put one cat-like-creature.png inside it… Otherwise our code will error!
So first, run:
mkdir src/assets
Then, if you don’t have a cat like creature picture lying around somewhere on I took the courtesy of drawing one, just for you!
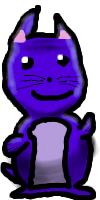
Feel free to download it and use it for whatever you’d like, or use your own, I won’t be offended. Just make sure whatever image you use, it’s saved in your project’s src/assets/cat-like-creature.png.
Following that, open up src/scenes/GameScene.js and add the following:
import {Scene} from 'phaser';

class GameScene extends Scene {

  constructor() {
    super("scene-game");
  }

  create() {
    // Add, scale, and make up a speed for our creature
    this.cat = this.physics.add.sprite(10, 10, 'cat-like');
    this.cat.body.setAllowGravity(false);
    this.cat.setScale(0.5);
    this.catSpeed = 300;
    // Create a helper object for our arrow keys
    this.cursors = this.input.keyboard.createCursorKeys();
  }

  update() {
    // Listen for keyboard input
    const {left, right, up, down} = this.cursors;
    if (left.isDown) {
      this.cat.setVelocityX(-this.catSpeed);
    }
    else if (right.isDown) {
      this.cat.setVelocityX(this.catSpeed);
    }
    else {
      this.cat.setVelocityX(0);
    }
    if (up.isDown) {
      this.cat.setVelocityY(-this.catSpeed);
    }
    else if (down.isDown) {
      this.cat.setVelocityY(this.catSpeed);
    }
    else {
      this.cat.setVelocityY(0);
    }
  }

}
export default GameScene;
Okay, we’re almost there I promise! :D
Head back over to your terminal, and run:
npm run start
Wait a moment, then bask in the glory of your fresh, shiny new game!!
If you enjoyed this tutorial, please share with someone else you think would benefit from it. Feel free to comment below!
As always, happy hacking!
Love Kirk M. (@saricden)
Header Image courtesy of Alexey Savchenko via Unsplash